
Getting ESP8266 work with MSP430 Launchpad


So, I bought a couple of ESP8266-01 modules to check out what the hype was all about. To all, those who do not know what an ESP8266 is, here is a little insight.
The chip is pretty powerful running at 80MHz and there is tremendous community support. I will post updates on my projects in future posts.
To get ESP8266 to run, you need to interface with the UART on the module. Most tutorials online will tell you to buy a FTDI USB to UART converter. There are some tutorials involving using an Arduino’s RX/TX port by removing the Atmega328 chip from the board and using a voltage divider on the RX pin of the ESP8266 to bring down the voltage to 3.3 V.
I had the Arduino, but I did not happen to have the right resistors (because I use SMD components everywhere). I did not even have the FTDI USB to UART converter. But I did have MSP430F5529 launchpad from Texas instruments which has plenty of UARTs operating at 3.3 V. The launchpad has its own USB FET to program the main chip which in turn has a UART back channel interface that is connected to UART0 of the main chip to the USB.
So, I hooked up my ESP8266 to the UART1 and planned to send commands and data over UART0. I programmed it in such a way so as to take data from UART0 and send it over UART1 pretty much acting as USB to UART that was required.
To write the code, I used Energia IDE which has api functions identical to that of Arduino.
|
1 2 3 4 5 6 7 8 9 10 11 12 13 14 |
void setup() { Serial1.begin(115200); Serial.begin(115200); } void loop() { while(Serial1.available()>0) Serial.print(Serial1.read()); while(Serial.available()>0){ Serial1.print(Serial.read()); } } |
I used RealTerm serial terminal to send out my first “AT” command and to my disappointment, the response was not as expected!
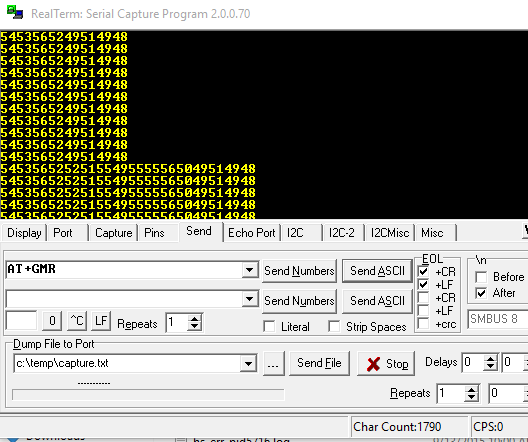
Numbers returning from ESP8266
I was absolutely confused as to what was happening. I spent several days trying to figure out what the hell was happening. I was about to give up, but then I realised that “Serial.read()” function actually converts the serial data stream into ASCII characters! Further down the line, Serial.print() converts to ASCII characters as well! So, Whenever I was typing A, it was being converted to ASCII code ’65’, which was again bring treated as individual characters, resulting in 54 53 for 6 and 56 52 for T and so on…
|
1 2 3 4 5 6 7 |
(54)(53) (56)(52) (49)(51) (49)(58) (6) (5) (8) (4) (1) (3) (1) (0) A T CR NL (54)(53) (56)(52) (52)(51) (55)(49) (55)(55) (56)(50) (49)(51) (49)(58) (6) (5) (8) (4) (4) (3) (7) (1) (7) (7) (8) (2) (1) (3) (1) (0) A T + G M R CR NL |
All I had to do was change Serial.print() to Serial.write() which writes binary data (without ASCII conversion) to the UART, which fixed the problem instantly and I could get a proper response from the ESP8266!
The final code:
|
1 2 3 4 5 6 7 8 9 10 11 12 13 14 |
void setup() { Serial1.begin(9600); Serial.begin(9600); } void loop() { while(Serial1.available()>0) Serial.write(Serial1.read()); while(Serial.available()>0){ Serial1.write(Serial.read()); } } |
I even flashed nodemcu firmware with this setup and it worked absolutely fine! Now that I have got this to work, I plan on doing some crazy stuff with the ESP8266 which I will post when I get some time off.

Hi, what libraries did you use? Serial and Serial1 are coming up as undeclared variables… or is this just because I’m trying to flash the program via USB3?