
Converting a binary data file into a C array with a python script

Those working on embedded C/C++ would know the importance of converting a binary file into a C array. I deal with raw images and ram dumps on daily basis. For example, I may be required to upload a raw image into the RAM connected to the processor for testing the rest of the code. At times, these raw images are simply some graphical elements of the user interface. My previous work flow was quite inefficient. Create an element in GIMP, export it as raw image. HxD hex editor helps me convert the raw binary file into a compile-able C-array. A quick tool specifically made for this purpose would have been the perfect solution for me.
I am a person who likes to remedy the situation. In this case, a quickly written Python script that generates C array from a binary file that can be compiled in any C compiler.
Read the binary data
We can quickly read the binary file with numpy. The fromfile() function makes our life simpler and that’s exactly what I will make use of.
|
1 2 3 4 |
def read_file(file_name): data = np.fromfile(file_name, dtype='uint8') data = bytearray(data) return data |
To make the code re-usable, I prefer using functions. Who knows how large this code might grow in future. It’s always better to start with modular code. The read_file() function quickly reads the binary file. I am interpreting the file as a bunch of 8 bit data set. You could interpret it as an int32, float or even double. A file is always a bunch of bytes. Its upon us on how it should be interpreted. Finally, I am interpreting the data as a python bytearray and return the same.
Writing the data as ascii
A C source file is ascii text. We now need to convert our bytearray into ascii text. For this, I would be writing another function to do all this. After all, we would also need to format our ascii text. Packing all these tasks into a function would simply look cleaner. Okay, enough talking, lets get to work.
|
1 2 3 4 |
def write_c_array(file_name, data): c_file = open(file_name + ".c", "w") array_content = "{{{}}}".format(", ".join(bytes_to_c_arr(data))) c_file.write(array_content) |
Our write_c_array() function takes two arguments; the file name and the data. Inside the function, we first create writable file with the file name passed in the argument. The bytes_to_c_array() function takes bytearray and returns ascii text that’s representative of the corresponding byte. The usual form is “0xhh” where h can be any value in range of 0 to F.
|
1 2 |
def bytes_to_c_arr(data): return [format(b, '#04x') for b in data] |
Finally, we do two things. One is to add a comma and a whitespace after each hex string. Secondly, we encapsulate the whole strong between curly braces. Since, you already know that in C we can define an array with unsigned char x[3] = {0x9, 0x4, 0x1}; Similarly, we need to add those curly braces to comply with the C syntax rules.
Beware, if your file is large, you will end up with a multi-mega-byte C file that requires a better text editor such as notepad++. On linux you should open this with something like Vim. Gedit would simply struggle to open large files.
Calling our functions
|
1 2 |
raw_data = read_file("raw_image.data") write_c_array("c_file", raw_data) |
I called the two functions as shown above and ended up with a large C array.

I am attaching the raw version of this file that you use for yourself. Further in the article I shall tell you how to generate a raw binary for yourself.
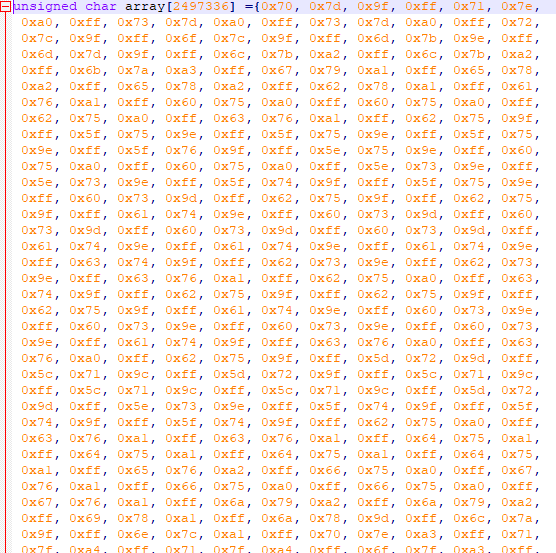
Finally, I ended up with a .c file which contained all the hex values encapsulated in curly braces. Here’s a snippet.
|
1 |
{0x70, 0x7d, 0x9f, 0xff, 0x71, 0x7e, 0xa0, 0xff,........ |
Now, for any C array to be usable, it needs to have some name. Let’s work on our python script to assign our array a name.
Correspondingly, I modified my writing function to add some static content that creates a C array.
|
1 |
static_content = "unsigned char array[" + str(len(data)) + "] =" |
This should look like a C array definition. Furthermore, the len(data) also computes the size of the array. Although that’s not necessary in this particular style of definition. Finally, we are nearing the end of it. We are still not done yet. If we look at the file, it would be one long array that goes for miles beyond the screen. Stack Exchange to the rescue, I found a code snippet that does the formatting for us.
|
1 |
final_content = re.sub("(.{66})", "\\1\n", final_content, 0, re.DOTALL) |
This piece of code is responsible for adding new line after every 66 characters. You could have any number of characters. For example, 72, 36 also looks nicely aligned.
The final code
The python script isn’t too big and hopefully someone may find it useful.
|
1 2 3 4 5 6 7 8 9 10 11 12 13 14 15 16 17 18 19 20 21 22 23 24 |
import re import numpy as np def bytes_to_c_arr(data): return [format(b, '#04x') for b in data] def read_file(file_name): data = np.fromfile(file_name, dtype='uint8') data = bytearray(data) return data def write_c_array(file_name, data): c_file = open(file_name + ".c", "w") static_content = "unsigned char array[" + str(len(data)) + "] =" array_content = "{{{}}}".format(", ".join(bytes_to_c_arr(data))) final_content = static_content + array_content final_content = re.sub("(.{72})", "\\1\n", final_content, 0, re.DOTALL) c_file.write(final_content) raw_data = read_file("raw_image.data") write_c_array("c_file", raw_data) |

nice one….
I think you made a small mistake in your code. Because sometimes (it depends on the source) the result will not align correctly with every 0xnn data.
remove line 19 and change line 20 by this :
final_content = “\n”+ static_content + “\n” + re.sub(“(.{72})”, “\\1\n”, array_content, 0, re.DOTALL) + “;”
now, it work all the times.
Regards.
Thanks for pointing it out
this actually works but should be careful with Unicode characters in examples but just straight copy pasting will result in an error, the “ ” quotes (curly U+201C) will not work with all interpreters. instead use: ” ” (straight quotes. ASCII 0x22)
using the curly quotes produces error under python3:
final_content = “\n”+ static_content + “\n” + re.sub(“(.{72})”, “\\1\n”, array_content, 0, re.DOTALL) + “;”
^
SyntaxError: invalid character ‘“’ (U+201C)
the following resolves on python3:
final_content = “\n”+ static_content + “\n” + re.sub(“(.{72})”, “\\1\n”, array_content, 0, re.DOTALL) + “;”
this is only a problem if your IDE or text editor “sees” Unicode.
Thanks for the tips.
Certainly been useful, thanks!