
PipelineC brings HLS to non-Xilinx FPGAs
Those of you who have used HLS (High level synthesis) would know how powerful the thing is. For those of you having some experience working with hardware description languages would most likely be able to write good HLS code. This new method isn’t something where any software guy would come in and start working on FPGAs. Only those with correct understanding of digital design can really exploit HLS’ full potential. Unfortunately, Xilinx HLS only works on Xilinx 7 series and above devices. For those of you working on non-Xilinx FPGAs were out of luck until now. Julian Kemmerer, has been working on remedying the situation since 2015! Although, replacing HLS may not be his goal but what he has created seems to be quite disruptive.
A quick overview of PipelineC
It would be best to read this on his github page. Nevertheless, I will have my own understanding of it written down. Writing HDL code can be quite tedious. You need to take care of absolutely every little detail. Dealing with control signals between any two blocks or stages can be a tedious to verify. Even when you have ready made modules, assigning signals to each input and output can be a simply time consuming job. What if such generic functionality is auto-generated for you? That is exactly what PipelineC does. It allows you to write some code in C language. A python script understands your code and generates logic blocks from it. Further, it translates those logic elements into VHDL code which any synthesis tool can understand. It will also pickup various devices parameters, propagation delays, etc from the device specific tools. For example, if you are using a Zynq device, it will pickup necessary static parameters from Xilinx Vivado.
As simple as it sounds, it takes a bit of learning curve to understand it all. There are some necessary functions and data types you must get accustomed to while using PipelineC. For example, you are no longer limited to 8 bit multiples for data width. PipelineC allows arbitrary data widths such as “uint3_t” which will result in a 3 bit standard logic vector. Declaring an array in C would result in RAM being instantiated in hardware.
Setting it up
Setting up PipelineC is very straight forward. I would suggest you use a linux system to try it out. Although, it can be used on Windows but for some reason my Python misbehaved there forcing me to use Linux. I will be using Peppermint OS, an optimized version of Ubuntu. You will need to have Xilinx Vivado installed in the environment. I am using Vitis 2019.2 and latest version of Peppermint OS. Also make sure you have python 3 installed because PipelineC does not work on anything lower.
Go to your linux home directory and download the git repository.
|
1 2 3 |
cd / git clone https://github.com/JulianKemmerer/PipelineC.git cd PipelineC |
It’s your choice what directory to use. Either way, go into the “PipelineC” directory and have a look around. You now need to open /src/VIVADO.py and enter the path to your Vivado installation.
You are now done with the basic setup. Next, let’s try to run the usual blinky example.
Running an example
By default, the PipelineC parser is programmed to pickup the “main.c” file situated in the base directory. Here is how the includes look like.
|
1 2 3 4 5 6 7 8 9 10 11 12 13 14 15 |
#pragma PART "xc7z010clg400-1" //#include "examples/aws-fpga-dma/loopback.c" //#include "examples/aws-fpga-dma/work.c" //#include "examples/fosix/hello_world.c" //#include "examples/fosix/bram_loopback.c" //#include "examples/keccak.pc" //#include "examples/arty/src/uart/uart_loopback_no_fc.c" //#include "examples/arty/src/work/work.c" //#include "examples/arty/src/fosix/main_bram_loopback.c" //#include "examples/fir.c" #include "examples/arty/src/blink.c" //#include "examples/arty/src/uart/uart_loopback_msg.c" //#include "examples/arty/src/ddr3/mig_app.c" //#include "examples/clock_crossing.c" |
The pragrama “PART” defines the FPGA part number. This part number gets passed onto the synthesis tool to extract necessary static timings which you can see as verbose output when you compile one of the codes. As you can notice, I have uncommented the blink.c. Make sure you also change the pragma PART in blink.c file. Also note that I have commented everything else and only left the “blink.c” in the file. Now, we are ready to compile and synthesize our first PipelineC example code.
Open your terminal, go to the base directory of PipelineC and execute the following commands.
|
1 |
python3 ./src/main.py |
This will invoke various other scripts that would decode your C code and synthesize into digital logic. By the end of synthesis, you should see the script spit out a “Done”.
|
1 2 3 4 5 |
Running: /home/nuclearrambo/Xilinx/Vivado/2019.2/bin/vivado -journal /home/nuclearrambo/pipelinec_syn_output/top/vivado.jou -log /home/nuclearrambo/pipelinec_syn_output/top/vivado_329f.log -mode batch -source "/home/nuclearrambo/pipelinec_syn_output/top/top_329f.tcl" Clock Goal (MHz): 100.0 , Current MHz: 139.50892857142856 ( 7.168 ns) Found maximum pipeline latencies... ================== Writing Results of Throughput Sweep ================================ Done. |
The output ends up in a separate folder called “pipelinec_syn_output”. You can always choose the location of this folder. I let mine to be default. A successful synthesis results in a file called “real_vhdl.tcl”. This is an important file which will allow us to import our digital block into Vivado environment.
Combining logic with everything else
Open your Vivado environment and create a new project. I am going to be using my Zybo board with Zynq 7010 device on it. Once you successfully create a new project, create a new block design. In case you happen to be absolutely new to Vivado and Zynq, do check my previous articles.
We can now invoke the “read_vhdl.tcl” file to include our PipelineC logic block into our FPGA project. Doing this is quite simple. Simply execute the following command in the Vivado tcl console.
|
1 |
source /path/to/pipelinec_syn_output/read_vhdl.tcl |
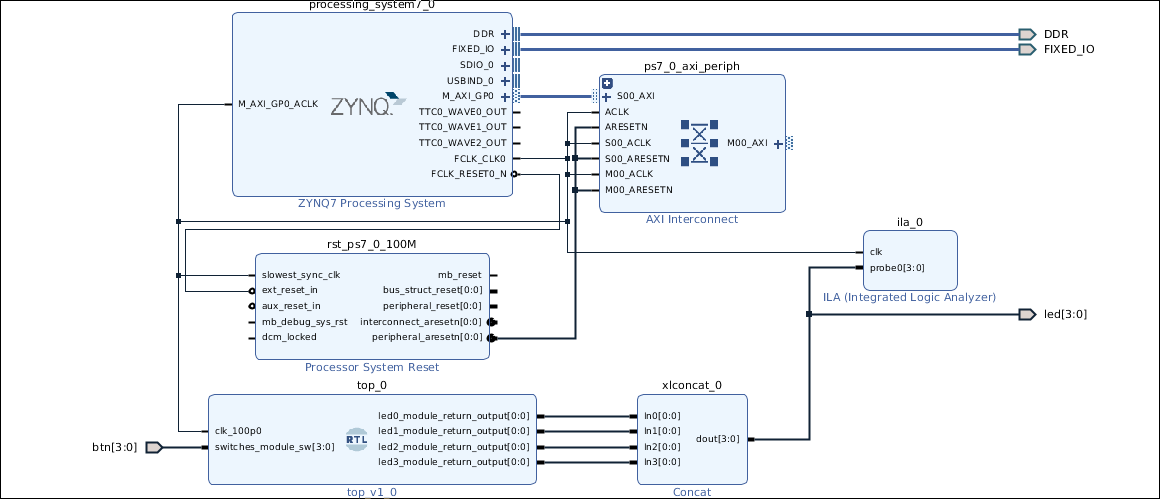
Running this tcl script imports your pipelineC logic block and automatically makes it the top level module. In some cases, you could let it be the top level module but not in my case. I want to include Zynq processing system in my block design. Eventually, I added everything required in my block design. It looks something like this.

The blinky module has 4 inputs and 4 outputs and a clock input at 100MHz. Furthermore, I also added ILA to probe the outputs although you don’t need it at all. Once you are done with the block design, right click on the block design in the “sources” view and click on “Create HDL wrapper”. When the wrapper is ready, right click on it and “Set as top”.

We are now ready to proceed. One last thing would be to make sure you have mapped your input and output ports to the appropriate pins. Without the constraints mapping, you won’t be able to see the signals toggling.
Click on “Generate bitstream” and let the process run. Hopefully, your bit stream generation completes without any problem. You can now program the bit file to your FPGA board. If you happen to use a Zynq or Ultrascale device, you need to carry out further steps.
Once again, beginners must check my other FPGA articles to get hang of Vivado and Vitis environment.
Only for Zynq:
In Vivado go to “File > Export > Export Hardware > Include bit file“. Open Vitis/SDK and create a project which uses the exported hardware hand off file. Simply create an empty project or a “Hello world project” and build it.
Program the FPGA from Vitis and that’s about it. I am sure there might be a direct approach to this but I do not know of it.
Understanding the PipelineC code
I am in no way an expert on this. Although, this is my take on the code.
Unlike the usual C program, there’s no compulsion on having a “main()” function. The blink.c code has a top level function called “app()”. There is no need to call this app() function anywhere else. When I first tried my hands on PipelineC, I did the usual C thing of calling app() from inside the main() function. That resulted in a horrible error. Even though, there’s no compulsion on having a “main” function, you must tell the PipelineC compiler the name of the function that behaves like a main function. In other terms, there should be one function that holds and brings everything together. Another #pragma lets you define your “master” function.
|
1 |
#pragma MAIN_MHZ app 100.0 |
This tells the compiler that the function called app is the main function and it runs at 100 MHz. Any input and output signals appear as top level ports in the VHDL code. On the contrary, there are no such inputs and outputs in the blinky example. Rather, it simply operates on globally visible ports that are defined in other functions defined in leds.c and switches.c files.
The WIRE_READ() and the WIRE_WRITE() functions are self explanatory. They connect your variables/signals to the block ports. Here, WIRE_READ() reads the switch states. On the other hand, WIRE_WRITE() writes to the led pins.
|
1 2 3 4 5 6 7 8 9 10 |
// Do what counters do, increment counter = counter + 1; // If the counter equals or greater then // time to toggle the leds and reset counter if(counter >= (sw * BLINK_CLK_CYCLES)) { leds_on = ~leds_on; counter = 0; } |
Maintaining the sequence
The variable “counter” increments every clock cycle and upon reaching a limit, it resets and toggles the leds_on signal. Furthermore, the leds_on signal connects to the “leds” port. Finally, we must remember that PipelineC synthesizes all our code into digital logic. Therefore, the moment counter hits the limit, it toggles the LED signal wires in the same clock cycle. In other words, everything inside this function runs simultaneously. Even though things are running simultaneously; if there happens to be data dependency from previous lines of code into later lines of code, the pipelineC compiler will keep this sequential execution intact. It does this by creating deeper combinatorial logic. The following image shows the synthesized schematic of our blinky program.
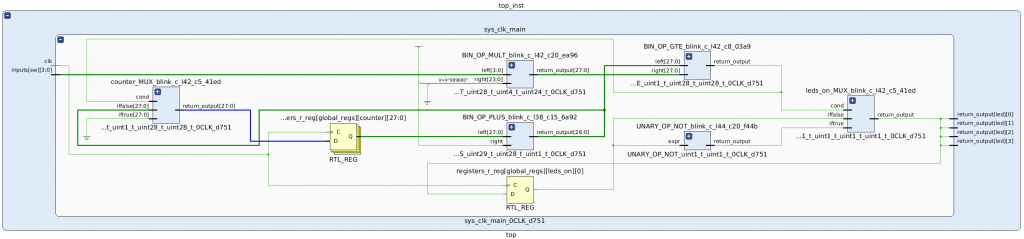
For example, the if statement checks whether the counter value exceeds the cycle count. The C code describes that the condition is checked only after being incremented. An identical functionality gets produced in VHDL. This example may not be the best demonstrator for pipelines. May be running the “dct” example would demonstrate the true significance of this. I will be using PipelineC further for AXI stream video. Along the way, I would also better understand and may be write my own pipelineC code.
The whole feel of PipelineC is very similar to Xilinx’s HLS. When it comes to HLS, there is easy instatiation of AXI, AXI-lite and AXI stream interfaces. You can easily define AXI-lite registers using basic pragmas. Such functionality in PipelineC would literally open up HLS for the non-Xilinx masses.
Do keep a watch for more articles about this. Comment below to let me know what would you like to see in my next PipelineC article.


Voice of the people