
Running Petalinux on Zynq SoC from scratch – Zybo board
In a couple of previous articles, we went over a few very basic designs on the Zynq SoC. Those examples used no operating system. They were all what we call “bare metal”. Running bare metal has it’s advantages and disadvantages. For example, you can quickly build and test things by manipulating registers and various other things. When things start to complex and need to interact with each other, writing software on bare metal could become a bit cumbersome. Having a basic OS allows one to skip the mundane tasks and focus on the main thing you intend to accomplish. Those mundane tasks we talked about are offloaded to the operating system; Petalinux in this case.
Zynq, a full-fledged ARM SoC has two parts to it. The processing system with dual core ARM Cortex A9 cores and programmable logic part. Similarly, a more recent SoC from Xilinx, Zynq Ultrascale+ comes with a higher number of processor cores and a much larger FPGA fabric.
I will be building the Linux Operating system with the help of Xilinx’s Petalinux tool. This post will more likely focus on actually getting Linux to run your Zynq SoC with minimum amount of effort. For someone new to Zynq, should at least go through my previous Zynq articles. If possible, try them out before you jump into Linux. This is not something you can continue to build upon if you have no background on this.
Creating a base project in Vivado
Compared to my previous projects, I upgraded myself to Vitis 2020.2 and PetaLinux 2020.2. This tutorial can still be tried out on Vitis 2019.2 or older versions. The flow hasn’t changed much over past few years. Like I said earlier, you need to try out the basic Zynq project in my older article because I won’t be showing each little step.
In Vivado, create a new project and open a new block design. Place the Zynq processing system block and run block automation.
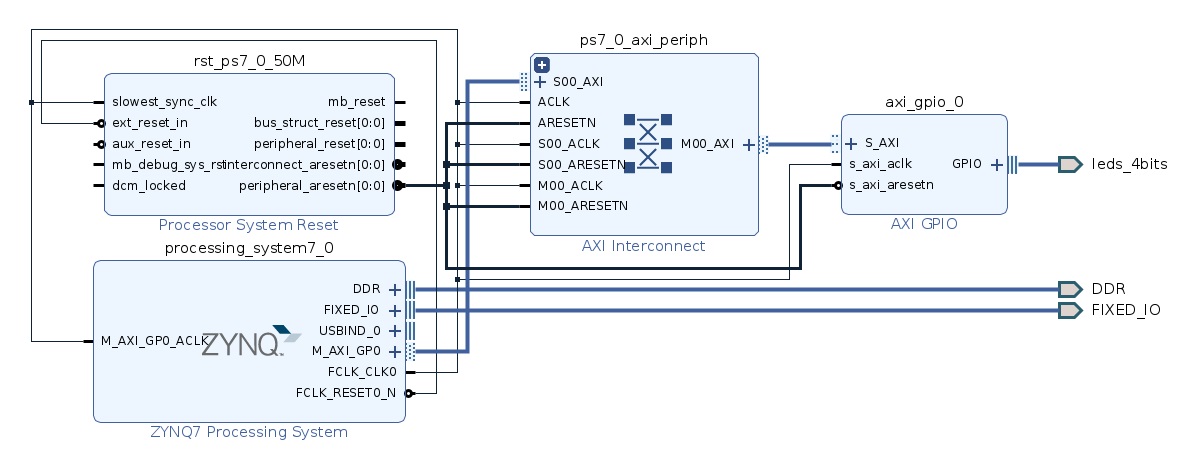
Next, you can simply continue to next part or spend some time adding logic blocks. In my case, I added a AXI GPIO block in the design. The AXI GPIO being connected to the 4 LEDs on my Zybo board will allow me to toggle some LEDs through Linux command line. Interesting right?
So far, this is how my block design looks.
Since, Zybo comes with its own board files, I do not need to do any kind of pin mapping with the constraints file. In case you are doing this on a custom board, make sure to map your IO lines in the constraints file. One advantage of having board files is you don’t need to do any other settings in the PS block. For those on a custom board, make sure to enable UART, Ethernet, SD card and also set your clock frequency correctly. On the Zybo board, UART 1 is mapped out to the USB port which we will be using late.
Build the design by clicking on “Generate bitstream” button. Once finished, export hardware with bitstream included. That will generate a .xsa file.
Let’s build linux
To proceed any further, you need to have Petalinux tools installed. Installing it all will take a couple of hours depending on how fast is your system. With that out of the way, everything else becomes quite simple.
Open your terminal and navigate into the project directory and run Petalinux settings script. You need to run this script every time you want to do something with the Petalinux tools.
|
1 |
source /path/to/installation/Xilinx2020.2/PetaLinux/2020.2/bin/settings.sh |
In order to confirm whether the script did anything at all, type this command and in response you should get the path to the petalinux binary.
|
1 2 |
echo $PETALINUX >/home/nuclearrambo/Xilinx2020.2/PetaLinux/2020.2/bin |
Yes, that’s where my Xilinx installation resides. You may get a different path depending on where you install.
Let’s ask Petalinux to read our .xsa file so that it can do some things based on it.
|
1 2 3 |
petalinux-create -t project -n LinuxBoot --template zynq cd LinuxBoot petalinux-config --get-hw-description=../your.xsa |
The first command creates a petalinux project using the “zynq” template and having a name “LinuxBoot”. This will create a folder with that name and you need to enter that folder to run the next commands.
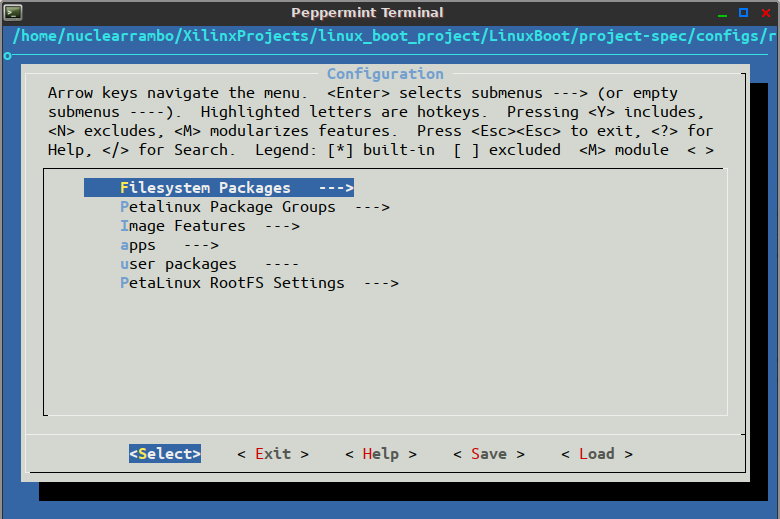
The configuration command will pop up a configuration window like below.
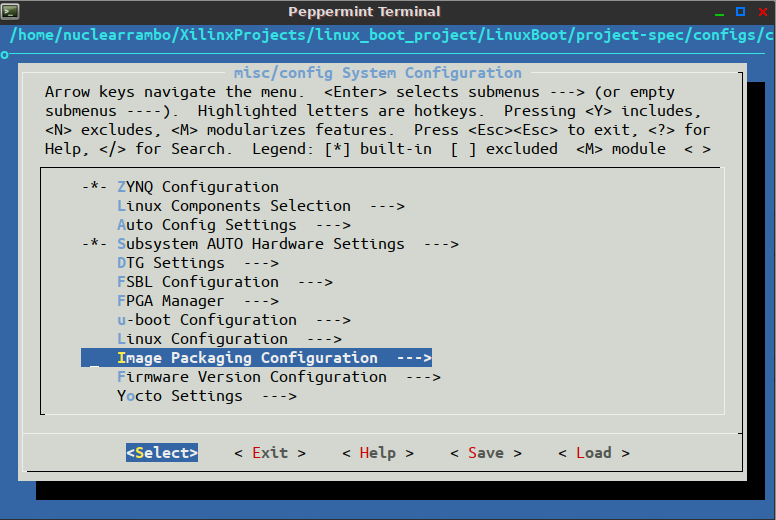
This is the first configuration dialog you will get in the process. It will allow you to do a variety of modifications to the base Linux system. If you haven’t noticed, Petalinux is all based on Yocto project. Our main purpose of this tutorial is to have a basic linux system running. Therefore, we won’t be diving into these settings at all.
You can simply exit and that will save the necessary settings in the project workspace. May be, once your linux system runs fine, you could come back to this step and try to play with these settings.
Configure u-boot
U-boot is a very commonly used second stage bootloader which loads the entire linux operating system. The first stage bootloader invokes u-boot after its finished executing and initializing the hardware. The First stage bootloader basically clears the ground of the grass and pokey things so that u-boot can lay down the red carpet for Linux.
|
1 |
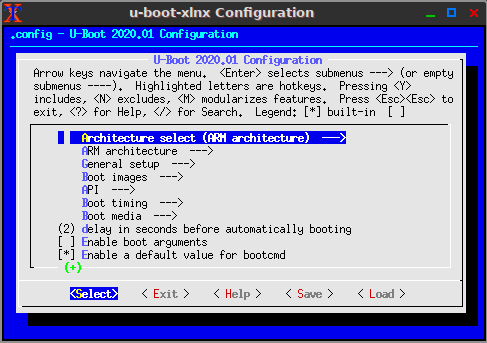
petalinux-config -c u-boot |
The wizard allows us to modify whole lot of low level bootloader settings. U-boot in itself has its own console and it will be quite interesting to write about one day. Right now, you can simply exit and proceed to next stage. We don’t really need to modify anything here.
Configure kernel
|
1 |
petalinux-config -c kernel |
Running this command would allow yourself to play with the linux kernel configuration. Normally, for this project we need not change anything except one setting.
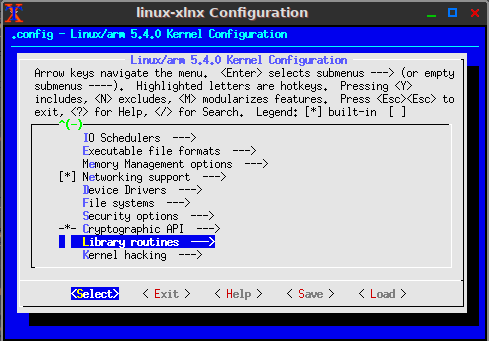
Scroll down until you see “Library Routines”. Hit enter, and modify the “Default contiguous memory area size” and make it “256”.
Configure the root file system
Finally, we need to configure the root file system by running the following command.
|
1 |
petalinux-config -c rootfs |
This configuration wizard allows us to modify what goes inside our Linux operating system. For example, we can configure it to compile certain packages and basic tools like Python, SSH, Apache webserver and so on. You get the point, the usual Linux stuff. Remember, that Linux OS in itself is basically a scheduler and handles all sorts of things from protecting memory locations, running applications, interacting with external hardware and what not. Everything else is an added bonus. The less “bonus content” you ask for, the smaller its size gets. Bare linux OS can sit happily in a tiny area as small as a few mega bytes. Its the “bonus content” or rather the applications that cause a inflation in its size.
I will now tell you what basic things you need to activate to have a usable system. This is what I did.
- Filesystem packages -> admin -> sudo
- Filesystem packages -> devel -> python
- Filesystem packages -> console -> network -> wget
I then proceeded further to save these settings and build the Linux system.
|
1 |
petalinux-build |
This will build the everything and spit out a few files that we need to package.
Packaging everything
The build process itself would take quite a while. Once you are done building, we need to package it all together with one last command.
|
1 |
petalinux-package --boot --force --fsbl images/linux/zynq_fsbl.elf --fpga images/linux/system.bit --u-boot |
Like I said earlier, Linux needs a first stage bootloader and a second stage bootloader. It all needs to be combined together into one file. Additionally, you need to remember that we are working on a FPGA as well. We can’t forget that FPGA also needs to be programmed while we are doing all this. Hence, the system.bit file. The petalinux-package command combines the FSBL and the bit file into one BIN file called BOOT.bin. Additionally, image.ub contains uboot. Of course, that’s not all but you get the idea. There are several other things that go into these files; for example, the device tree.
Finally, you will also find rootfs.tar.gz being generated in the images/linux path. Lets find out what we do to it.
Preparing the SD card
Now that we are done compiling and building linux, we can finally put it to test. Before we do that, we need to prepare our SD card.
Make two partitions on your SD card. The first partition needs to be of FAT32 file system with at least 500MB space. Whereas, the second partition needs to be of EXT4 file system.
Extract the contents of rootfs.tar.gz into the ext4 partition using the following command.
|
1 2 |
tar -xzvf rootfs.tar.gz -C /media/nuclearrambo/root_partition/ sync |
Furthermore, copy the following three files into the FAT32 partition;
- BOOT.bin
- boot.scr
- image.ub
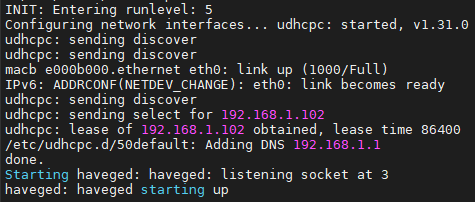
That’s all! Insert the SD card into the board and power it up. On the Zybo board, you should see a bunch of text getting thrown over the UART. All this text comes from the various stages of linux booting process. Here is a small screenshot of the text.

If everything goes well, you should have a login prompt appear. In that case, your login credentials are root and root.

On the other hand, if you happen to have Ethernet on your board, you can plug in the cable. Usually, the router on your network will auto-assign an IP address to your Zynq board which can be spotted in boot up text.
Use this IP address to gain access of your board over SSH. Now, this means you can open your SSH port on your network and remotely connect to your Zynq Petalinux instance. It also means, that this board operates quite well over a network interface. Ideally, you should now be able to run any service on it like any other Linux system.
Trying out Python
Remember, I had enabled Python while configuring the rootfs. Time’s come to test our Python setup. Someone with basic idea about python needs no further explanation. For the sake of it, try out the following command.
|
1 2 |
python >>help("modules") |
The above command will help you list down all the available python packages.
Playing with the GPIOs
I hope you remember that we still got the GPIO block in place. We need to try using the GPIOs if they work at all. Now, you can find the address of the AXI GPIO in the Vivado address editor. Furthermore, it can also be found through command line in Petalinux.
|
1 2 |
root@LinuxBoot:~# cat /sys/class/gpio/gpiochip1020/label /amba_pl/gpio@41200000 |
There could be multiple GPIOs in your system, but you can always find the right one with the label. Since, we know that our GPIO block is connected over AXI bus which happens to be part of the AMBA bus standard; that makes it easy to identify the correct block. Additionally, you can also try the ngpio keyword instead of label. That will display the number of GPIO pins available on the particular block. That’s rather a crude way to do things but in this case, it should have no issue.
The number after the @ symbol is the address of the peripheral. You can always cross check this with the Vivado address listing.
With the devmem command, we can directly write to the given memory mapped peripheral address. Correspondingly, the data register of the GPIO block has an offset of 0x00. Therefore, a direct write to the 0x41200000 address should directly set/reset the GPIOs.
|
1 |
devmem 0x41200000 8 0xF |
This command will write ‘1’ to all the 4 GPIOs.
Looking at the command, the 3rd parameter ‘8’ stands for the data width. Here, we are only writing 8 bits of data because I know that I got only 4 GPIOs to work with. You could go all the way up to 32 bits.
Physically, you should be able to see all four LEDs light up. Another way to verify whether the command worked would be to read back the data register.
|
1 2 |
devmem 0x41200000 8 >0x0F |
The readback 0x0F confirms that we have successfully written to the desired memory address.
Final words
I hope you found this short tutorial interesting. In one of the future articles, we will dive a little deeper into Petalinux and run some interesting application on it.
Hi
Have you any idea why after “petalinux-config -c kernel” I did not get the wizard configuration?
Currently, replicating your example however, I cannot switch the LEDS from petalinux, I guess it is because I did not set “Default contiguous memory area size”.
bests,
Martin
What version of petalinux are you using? The flow has changed slightly in the newer versions.